I still remember standing on my 6-by-4-foot apartment balcony three summers ago, holding a dead basil plant in one hand and a $4 grocery store packet of wilted herbs in the other. I had no yard. No raised beds. Just concrete, a railing, and the stubborn belief that I deserved fresh tomatoes that didn’t taste like refrigerated cardboard. That first basil plant died because I treated it like a houseplant. I drowned it. Then I baked the next one in a metal pot that turned into a solar oven by noon. By August, I was convinced that container food gardening was a Pinterest myth designed to make apartment dwellers feel inadequate.
But here’s what changed: I stopped copying pretty pictures and started paying attention to what my actual space, schedule, and budget could handle. Two years later, that same concrete slab produced cherry tomatoes, peppers, salad greens, strawberries, and enough herbs to stop me from buying those plastic clamshells entirely. If you are staring at a small patio, a balcony, a windowsill, or even a sunny driveway and thinking I don’t have enough room to grow real food, I wrote this for you. Container food gardening is not about having space. It is about using the space you have with intention.
Why Container Food Gardening Is the Perfect Solution for Small Spaces
Let’s be honest about the problem first. Most people who want to grow their own food are stopped by one of three things: they rent and can’t tear up the lawn, they live in an urban apartment with zero dirt access, or they are terrified of committing to a full garden they might kill. Container food gardening removes all three barriers. You are not landscaping. You are curating a collection of moveable, manageable ecosystems that happen to feed you.
The flexibility is what saved me. When a sudden hailstorm hit last spring, I dragged my tomato pots into the kitchen. When I realized my south-facing wall got brutal afternoon sun, I shifted my lettuce to the east-facing railing where it thrived instead of bolting. You cannot do that with an in-ground plot. Containers let you experiment without permanence, which is exactly what a beginner needs.
The Real Problems I Faced (And Probably You’re Facing Too)
Before I give you the steps, I want to validate the frustration. My first season failed because I misunderstood the fundamentals. Here are the specific problems that trip up most container food gardeners.
Not Enough Sunlight (Or Too Much)
I assumed my balcony was “sunny” because it felt bright. But bright to human eyes is not the same as direct sunlight for six to eight hours, which most fruiting vegetables need. I tried to grow tomatoes in a spot that got maybe four hours of dappled light. They grew tall and skinny and never fruited. On the flip side, my south-facing wall in July turned dark-colored pots into literal heat traps. I cooked a pepper plant’s roots before I realized what was happening.
Overwatering Everything
This is the most embarrassing mistake, and it is also the most common. When you grow food in containers, the drainage is everything. I used pots with no holes because they looked cleaner. I watered on a schedule instead of checking the soil. I killed three pepper plants and a zucchini with kindness before I accepted that soggy roots rot faster than dry roots wilt.
Choosing the Wrong Containers
I started with whatever looked nice at the home store. Small ceramic pots for tomatoes. A tall narrow planter for carrots. A metal bucket for herbs. None of these worked because I was thinking like a decorator, not a gardener. Tomatoes need depth and volume. Carrots need loose, deep soil without rocks blocking them. Metal conducts heat and dries out soil in hours. I was setting myself up to fail before I even planted a seed.
Step-by-Step: How to Start Your Container Food Garden Today
If I were starting over with zero knowledge and a small budget, this is exactly what I would do. No shortcuts. No vague advice.
Step 1: Audit Your Space Honestly
Before you buy a single seed, spend three days watching your light. Pick a weekend. Check your potential growing spot at 8 a.m., noon, and 4 p.m. Count how many hours of direct sun hit the area. If you get six or more hours, you can grow tomatoes, peppers, cucumbers, and beans. If you get four to five hours, focus on leafy greens, herbs, radishes, and some root vegetables. If you get less than four, you can still grow lettuce, spinach, arugula, and many herbs, but you will need to skip the fruiting crops.
Also check for wind. My balcony is on the third floor, and the wind dessicates soil and snaps stems. If your space is exposed, you will need to plan for protection, which I will cover in a moment.
Step 2: Pick the Right Containers
Here is the rule I wish someone had told me on day one: the bigger the pot, the more forgiving it is. Small pots dry out in hours and leave no room for root expansion.
For one cherry tomato plant, use a container that holds at least five gallons. I use 18-inch diameter plastic pots. They are lightweight, cheap, and the plastic does not heat up like ceramic or metal. For peppers, a three to five-gallon pot works. For leafy greens like lettuce or spinach, a wide shallow container at least six inches deep is fine. For carrots, you need depth—twelve inches minimum, and the soil must be loose and rock-free.
Always, always, always ensure drainage holes exist. If your perfect pot lacks them, drill them. If you cannot drill, use that pot as a decorative outer shell and place a nursery pot with drainage inside it.
Step 3: Choose Beginner-Friendly Food Crops
I know the temptation. You want the heirloom beefsteak tomatoes and the exotic chili peppers. Resist that for season one. Your goal is to build confidence and learn your space. These are the crops that forgave my mistakes and actually fed me:
-
Cherry tomatoes: ‘Tiny Tim’ or ‘Tumbling Tom’ are compact and prolific.
-
Bush beans: They do not need trellising and produce heavily in small pots.
-
Lettuce and spinach: Fast turnaround, shallow roots, and they tolerate some shade.
-
Radishes: Ready in thirty days and nearly foolproof.
-
Herbs: Basil, parsley, chives, and mint are workhorses. Mint needs its own pot or it will bully everything else.
-
Strawberries: Alpine or everbearing varieties do beautifully in hanging baskets or tall pots.
I grew all of these in my first successful season. They taught me timing, watering, and harvesting without the heartbreak of a failed watermelon vine.
Step 4: Use the Right Soil Mix
Do not use garden soil in containers. It is too heavy, compacts, and may carry pests or diseases. I made this exact error with a bag of cheap topsoil, and my lettuce seedlings sat in that dense mud like they were stuck in concrete.
Buy a high-quality potting mix. Look for words like “lightweight,” “well-draining,” and “for containers.” I mix my own now to save money: one part peat-free potting mix, one part compost, and one part perlite or vermiculite for aeration. That blend drains well but holds enough moisture that I am not watering three times a day.
Step 5: Master the Watering Rhythm
This is the skill that separates thriving container gardens from constant disappointment. Pots dry out faster than the ground. In midsummer, my five-gallon tomato pots need water every day, sometimes twice if the temperature spikes above ninety degrees.
But here is the trick: check before you pour. Stick your finger two inches into the soil. If it feels dry at that depth, water deeply until it runs from the drainage holes. If it is still damp, wait. Overwatering looks a lot like underwatering—yellow leaves, drooping—but the fix is the opposite. I killed too many plants by assuming droop meant thirst.
Mulching the top of your containers helps enormously. I use straw or shredded leaves. It cuts evaporation by half and keeps the soil temperature stable.
Step 6: Feed Your Plants Without Burning Them
Container plants are dependent on you for nutrients because they cannot send roots out to forage. But beginners often dump in fertilizer and burn the roots. I did this with a tomato plant and watched the leaves turn crispy at the edges within forty-eight hours.
Use a balanced, water-soluble organic fertilizer at half strength every two weeks once plants are established. For fruiting plants like tomatoes and peppers, switch to one slightly higher in phosphorus and potassium once flowering begins. I use a simple liquid tomato feed, diluted properly, every ten days during peak season. Less is more. You can always add more, but you cannot take it back.
5 Mistakes I Made That You Should Avoid
I want to be specific here because generic advice never helped me. These are the exact errors that cost me plants and money.
1. Crowding too many plants in one pot. I put four tomato seedlings in a single large planter because I wanted variety. They strangled each other for light and nutrients. One plant per five-gallon pot. Period.
2. Ignoring the weight load. My balcony has a weight limit. A large ceramic pot filled with wet soil can weigh over a hundred pounds. I switched to plastic and fabric grow bags, which are dramatically lighter and fold flat for winter storage.
3. Skipping the hardening off. I bought a beautiful pepper seedling from a greenhouse and placed it directly on my windy balcony. It sunburned and windburned within a day. When you move store-bought or windowsill-started plants outside, give them a week of gradual exposure—an hour of outdoor shade on day one, increasing slowly.
4. Planting at the wrong time. I got excited in March and planted basil outside while nights were still dipping into the forties. Basil hates cold. It sulked and never recovered. Know your last frost date and your local climate. Warm-season crops need consistent nights above fifty degrees.
5. Giving up after the first failure. My first season was a disaster. If I had quit, I would still be buying those plastic herb clamshells. Container food gardening is a skill, not a talent. You learn by doing, failing, and adjusting.
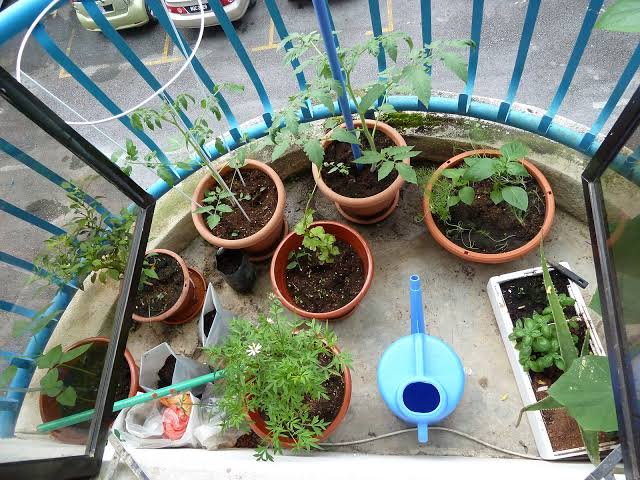
Real Examples from My Second-Season Garden
To show you this is not theory, here is what my second season looked like on that same 6-by-4-foot balcony. I used two five-gallon pots for cherry tomatoes, one three-gallon pot for a compact pepper, two wide shallow planters for rotating lettuce and spinach, one twelve-inch pot for radishes, a long railing planter for herbs, and a hanging basket for strawberries. That is seven containers. Total cost for pots and soil that year was about sixty dollars, spread across the season.
From June through September, I harvested cherry tomatoes twice a week, cut lettuce every few days, pulled radishes in batches, picked peppers in late August, and ate fresh strawberries most mornings. I spent maybe twenty minutes a day on maintenance—watering, checking for pests, harvesting. The grocery savings were modest, maybe fifteen dollars a month, but the flavor and the satisfaction were not measurable in dollars. A tomato still warm from the sun tastes like an entirely different food group than a store-bought one.
Frequently Asked Questions
Can I really grow enough food in containers to matter?
For one person in a small space, yes. You will not grow all your calories, but you can absolutely replace your salad greens, herbs, and snacking vegetables from late spring through early fall. In my peak months, I stopped buying tomatoes, lettuce, and herbs entirely.
What is the cheapest way to start container food gardening?
Use food-grade buckets from restaurants or bakeries—they are often free. Drill drainage holes, fill with quality potting mix, and start with seeds instead of seedlings. Radishes, lettuce, and beans from seed are incredibly cheap and reliable.
Do I need to worry about pests on a balcony?
Yes, but usually less than in-ground gardens. Aphids and spider mites are the most common. I control them with a strong spray of water every few days and insecticidal soap if needed. Because my pots are isolated, I have never dealt with the soil-borne issues that plague traditional gardens.
How do I garden on a windy balcony?
Wind dries out soil and damages plants. Use heavier pots or place rocks in the bottom for stability. Create a windbreak with a trellis, a balcony privacy screen, or even larger plants shielding smaller ones. I keep my lettuce behind my tomato pots, and that alone blocks enough gust to keep the leaves tender.
Can I grow food indoors in containers?
Absolutely, but with caveats. Leafy greens and herbs grow well under a bright south-facing window or a basic LED grow light. Fruiting plants like tomatoes need intense light—usually a dedicated grow light for fourteen to sixteen hours daily—to produce. I start my seedlings indoors, but I move the fruiting crops outside once the weather allows.
Conclusion: Start Ugly, Start Small, Just Start
Container food gardening is not about having the perfect setup. It is about starting with one pot, one plant, and the willingness to pay attention. I began with a dead basil plant and a concrete slab. Now I grow a meaningful portion of my own food in a space smaller than a parking spot. The tomatoes I eat in August are not just food. They are proof that I learned something, that I paid attention to a living thing, and that I solved a problem with my own hands.
If you are standing at the beginning of this journey, feeling like your space is too small or your thumb is too brown, I get it. Buy one five-gallon pot. Fill it with good potting mix. Plant one cherry tomato seedling in a spot that gets six hours of sun. Water it when it is dry. Feed it every two weeks. Watch it like it matters—because it does. That one plant will teach you more than any article, including this one. And when you bite into that first tomato, still warm from the sun, you will understand why the effort was worth it.
Your balcony, patio, windowsill, or driveway is not a limitation. It is just a container garden waiting to happen. Start today.