I walked into my first solo apartment three years ago with a box of hand-me-down furniture and a serious Pinterest addiction. The walls were white. The floors were beige. It looked like a hospital waiting room with a bed. I knew plants were the answer—every interior photo I loved had trailing vines, sculptural leaves, and that effortless “I just live here surrounded by nature” vibe. So I did what any rational person would do. I went to the nursery, bought the prettiest plants I could find, and arranged them exactly like the photos. Within six weeks, half were dead. A fiddle leaf fig dropped every leaf until it was a stick in a pot. A calathea curled up and turned crispy. A trailing pothos—supposedly unkillable—went yellow and mushy because I had placed it in a dark bathroom with no drainage.
I was left with a collection of empty ceramic pots and a serious case of plant parent imposter syndrome. The problem was not that I lacked a green thumb. The problem was that I was trying to decorate with plants instead of living with them. I had to learn that decorative and aesthetic plants are not accessories. They are living things with specific needs, and if you ignore those needs in favor of a photo opportunity, you end up with expensive compost.
But I did not give up. I changed my approach entirely. Today, that same apartment is filled with thriving plants that actually look good—curated, intentional, and alive. If you want a home that feels warm, designed, and connected to nature without the constant cycle of buying, killing, and replacing, this is the guide I wish I had found when I was standing in that nursery with a cart full of regrets.
Why Most People Fail at Decorating With Plants
Let me be direct about where I went wrong, because you are probably making the same assumptions.
First, I bought plants for how they looked in the store, not for where they would live in my home. That fiddle leaf fig needed bright, filtered light. I put it in a corner that got thirty minutes of morning sun and expected it to become a six-foot statement piece. It was never going to happen. Second, I treated drainage as optional. Those ceramic pots with no holes looked sleek and modern. They also trapped water and rotted roots. Third, I thought watering meant “a little bit every day” instead of “deeply when needed.” I was essentially giving my plants sips of water that never reached their roots while keeping the surface constantly damp.
The real problem is that the home decor industry sells plants as styling objects. They do not tell you that the monstera in the corner of a magazine spread is probably a plastic replica or maintained by a professional plant care team. If you want living plants that actually contribute to your space, you need to bridge the gap between aesthetics and biology.
Step-by-Step: Building a Plant Collection That Is Beautiful and Alive
Here is exactly how I rebuilt my approach from scratch. If you follow this, you will skip the expensive trial-and-error phase I endured.
Step 1: Assess Your Light Honestly (This Is Non-Negotiable)
Before you bring home a single plant, you need to understand what you are working with. I spent a weekend tracking light in every room. I checked at 8 a.m., noon, and 4 p.m. I noted which windows got direct sun, which got bright indirect light, and which were basically caves.
Here is the simple breakdown that changed everything for me:
-
South-facing windows: Strong, direct light for most of the day. Good for cacti, succulents, fiddle leaf figs, and bird of paradise.
-
East-facing windows: Gentle morning sun, bright indirect the rest of the day. Ideal for pothos, philodendrons, monsteras, and most tropicals.
-
West-facing windows: Intense afternoon sun. Good for hardy plants like snake plants, zz plants, and some succulents if you acclimate them.
-
North-facing windows: Low light. Only reliable for snake plants, zz plants, pothos, and some philodendrons.
I made a floor plan and labeled each spot with its light level. Then I only bought plants that matched those conditions. It sounds clinical, but it is the difference between a thriving plant wall and a plant graveyard.
Step 2: Choose Plants That Earn Their Keep
Not all plants are equally useful for home decor. Some are finicky, some are dramatic, and some are so slow-growing that they never fill the visual space you need. I learned to prioritize plants that are both beautiful and forgiving.
For sculptural statement pieces:
-
Snake plant (Sansevieria): Vertical, architectural, and nearly impossible to kill. It tolerates low light and neglect.
-
Bird of paradise: If you have bright light and space, this gives you that tropical hotel lobby vibe.
-
Fiddle leaf fig: Only if you have bright, consistent light and patience. It is beautiful but demanding. I waited until year two to attempt one again.
For trailing and filling vertical space:
-
Pothos: The classic for a reason. It grows fast, trails beautifully, and tolerates a range of light.
-
Philodendron brasil: Colorful variegation, vigorous growth, and easy care.
-
String of pearls: Great for high shelves, but needs bright light. I killed my first one in a dark corner.
For texture and fullness:
-
Calathea or prayer plant: Stunning patterned leaves, but they need humidity and consistent watering. I keep mine near a small humidifier.
-
Rubber plant: Dark, glossy leaves that look expensive. Tolerates medium light.
-
Monstera deliciosa: The iconic split-leaf plant. It makes any room feel designed.
I started with five plants that matched my light conditions. Five thriving plants look infinitely better than twenty struggling ones.
Step 3: Use the Right Pots (And Yes, Drainage Matters)
This is where aesthetics and plant health finally meet. I stopped buying pots based on looks alone and started buying based on function, then making them beautiful.
Every plant needs drainage. If you fall in love with a pot that has no hole, use it as a cachepot—an outer decorative shell. Keep your plant in a nursery pot with drainage holes, drop it inside the decorative pot, and remove it when you water. This one change probably saved half my collection.
For material, I prefer terracotta for plants that hate wet feet—like succulents, snake plants, and cacti. It is porous and dries out quickly. For tropical plants that like consistent moisture, I use glazed ceramic or plastic nursery pots inside decorative containers. I avoid unglazed concrete for moisture-loving plants because it wicks water away from the roots.
Size matters too. A pot that is too large holds excess soil that stays wet and rots roots. When repotting, go up only one to two inches in diameter. I repotted a pothos into a pot that was way too big, and it sat in damp soil for months before I realized why it was yellowing.
Step 4: Develop a Watering System That Works
I killed plants with kindness by overwatering. Then I nearly killed a snake plant by underwatering for three months. Here is the system that finally worked.
I check my plants every Sunday. I do not water on a schedule. I stick my finger two inches into the soil. If it is dry, I water thoroughly until water runs from the drainage holes. If it is damp, I leave it alone. For plants in cachepots, I remove the nursery pot, water in the sink, let it drain completely, and then return it to the decorative pot.
I also learned to read the signs. Drooping leaves on a pothos usually mean thirst. Yellow leaves often mean overwatering. Brown crispy tips on a calathea mean low humidity. I keep a simple notes app on my phone where I jot down what each plant looks like week to week. It sounds obsessive, but it took me from guessing to actually knowing.
Step 5: Style With Intention, Not Imitation
This is the fun part, but it only works if the plant is healthy first. I stopped trying to copy magazine spreads and started thinking about what my actual space needed.
Height variation: I use plant stands, stools, and shelves to create levels. A tall snake plant on the floor, a medium rubber plant on a stand, and a trailing pothos on a high shelf create visual flow without clutter.
Grouping: Plants look better in clusters of odd numbers. I group three plants with different leaf shapes and heights together. It creates a focal point instead of scattered randomness.
Negative space: I used to cram plants everywhere. Now I leave breathing room. One statement plant in a corner is more impactful than five small plants fighting for attention.
Matching pots to the room: I chose a limited palette—terracotta, white ceramic, and matte black. It keeps the collection from looking chaotic. The plants provide the color and texture; the pots provide the structure.
5 Mistakes That Will Destroy Your Aesthetic (And Your Plants)
These are specific, painful lessons from my own experience.
1. Buying plants before understanding your light. I cannot stress this enough. That gorgeous cactus in the dark hallway will stretch, weaken, and die. It is not a matter of if. It is when.
2. Ignoring humidity. My first calathea turned brown and crispy because my apartment in winter had the humidity of the Sahara. Tropical plants need moisture in the air. I now run a small humidifier near my sensitive plants, or I group them together so they create a microclimate.
3. Using the wrong soil. I used garden soil in a pot once. It compacted into a brick and suffocated the roots. Use a high-quality potting mix. For succulents and cacti, use a fast-draining cactus mix or add perlite. For tropicals, a standard peat-free potting mix works well.
4. Moving plants constantly for photos. I used to shift my plants around for Instagram shots, putting a low-light plant in direct sun for a “better angle.” That stress caused sunburn and leaf drop. Find the right spot and leave them there.
5. Buying too many, too fast. I tried to go from zero to jungle in a weekend. I could not keep track of each plant’s needs, and I missed early warning signs. Start with three to five plants. Master those. Then expand.
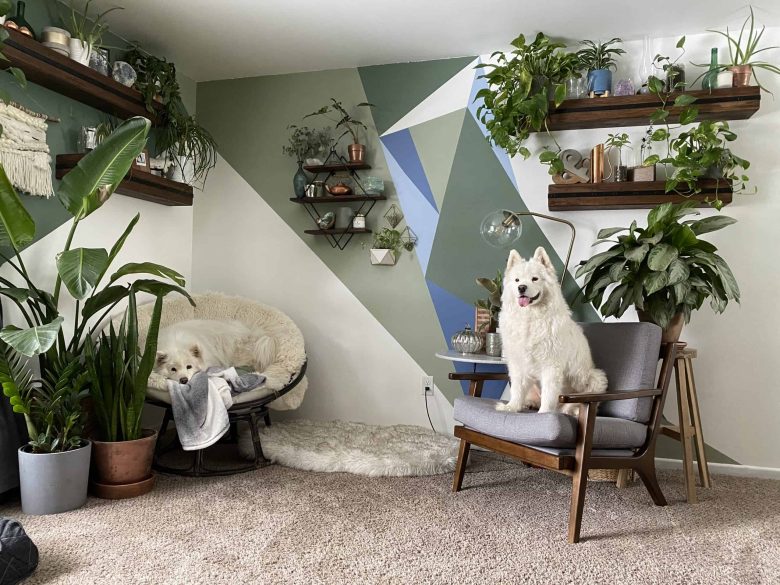
Real Examples: How I Styled My Living Room
Here is a concrete look at what works in my actual space, which is a 400-square-foot apartment with one large south-facing window and one east-facing window.
In the south-facing corner, I have a bird of paradise in a large terracotta pot on a wheeled plant stand. It gets bright, direct morning light and fills the vertical space beautifully. Next to it on a lower stool sits a rubber plant in a matte black ceramic cachepot. The contrast in leaf shape—broad and split versus dark and oval—creates visual interest without clutter.
On the east-facing wall, I mounted three simple wooden shelves. The top shelf holds a trailing pothos in a white ceramic pot. The middle shelf has a small grouping: a philodendron brasil, a compact snake plant, and a tiny string of pearls. The bottom shelf is empty. That negative space makes the plants above it look intentional, not crowded.
In the bathroom, which has a small frosted window, I keep a single zz plant. It tolerates the low light and humidity. One plant. One pot. It looks clean and spa-like instead of cluttered.
The total cost to build this collection over six months was about two hundred dollars, including pots and a small humidifier. It would have been less if I had not wasted money on the first round of dead plants.
Frequently Asked Questions
What are the best decorative plants for beginners?
Start with snake plants, pothos, zz plants, and spider plants. They tolerate inconsistent care, adapt to a range of light, and have strong visual shapes that look intentional in any room. Once you have kept those alive for six months, branch into more demanding plants.
How do I make my plants look like they belong in a designed space?
Limit your pot colors and materials to two or three options. Group plants in odd numbers. Use stands and shelves to create height variation. Most importantly, choose healthy plants that fit the scale of your room. One large statement plant looks more designed than ten tiny pots scattered everywhere.
Can I keep decorative plants in rooms with no windows?
Only if you add artificial light. Even the most tolerant plants need some light to survive long-term. I use a full-spectrum LED grow bulb in a standard floor lamp for a corner that gets no natural light. It is not ideal, but it keeps a pothos and a snake plant alive and looking decent.
How often should I repot my decorative plants?
Most houseplants need repotting every one to two years, or when you see roots growing through the drainage holes or circling the surface. Do not rush to repot. Many plants are happier slightly root-bound than drowning in a pot that is too large.
Why do my aesthetic plants keep dying even though I water them?
Usually it is one of three things: wrong light for the plant, no drainage causing root rot, or overwatering. Check your light first. Then check that your pot drains. Then adjust your watering to “soak deeply when dry” instead of “a little bit often.” Most plant deaths are environmental, not a lack of care.
Conclusion: Let the Plants Teach You
Decorative and aesthetic plants are not about achieving a perfect Instagram home. They are about creating a space that feels alive, intentional, and connected to the natural world. I started with a bare apartment and a cart full of doomed impulse purchases. I ended with a home that feels like mine—warm, layered, and genuinely green.
The secret is not a green thumb. The secret is observation. Pay attention to your light. Pay attention to your soil. Pay attention to how your plants respond to water and placement. They will tell you what they need if you are willing to listen instead of just looking.
Start with one room. Pick one spot with decent light. Buy one plant that matches that light. Put it in a pot with drainage. Water it when it is dry. Watch it for a month. Then add another. A beautiful plant-filled home is not built in a weekend. It is built one living thing at a time, with patience and attention.
Your space deserves to feel alive. Give it time, give it the right plants, and give yourself permission to learn as you go. The jungle will come.